Hubby and I moved to Florida seventeen years ago, in that time we have collected a fair amount of sea shells on our weekend jaunts to various beaches around the state. He likes the grey-blue bivalve shells, I gravitate towards conch or similar gastropod shells. The shells that catch my eye are worn down to the center spiral. I find something perfect in their imperfection and they remind me of my favorite flower, the Calla Lilly. Of course I love a perfect shell, but perfect gastropod shells are hard to find (in my experience) and if you come across one, they usually have a tenant. I leave those alone for obvious reasons. I’ve always had a fascination with looking inside the structures of nature. It doesn’t matter if it’s looking inside the human body via dissection or the simplicity of picking up a shell and viewing the spirals and the golden ratio. Nature is always surprising.
So what do you do with all of the shells you accumulate over the course of seventeen years? Well, you wait until you have inspiration I guess.
I had envisioned a grand something or another that would showcase our shells in a not so cheesy way. Last year I created a pathetic “flower arrangement.” I was aiming for a bouquet of “lilies,” but it was very heavy and not what I envisioned. Perhaps I’ll figure out a better design for that sometime in the future, but for now it’s a no go and high on the cheesy craft list.
I finally found inspiration at a swanky boutique in St. Pete last summer. A gorgeous oyster shell wreath and a matching mirror, both as far from cheesy as possible. The mirror was close to $1200 and the wreath around $800, eek! That was a bit outside my decor budget, but I had our shells and knew I could create something similar. The inspiration needed to marinate in my brain for a while until I figured out how to execute it!
A few months later I found two oyster shell wreaths at our local TjMaxx and suddenly I was reminded of my inspiration pieces. The hamster wheel in my head started to turn. I could use the oyster shells to get that “boutique” look and use our collected shells to give it that one of a kind personal touch. I walked out of the store with my two wreaths and feeling no shame for haggling with the manager because one was broken. Hey, I saved 25% on something I was taking apart anyway. Score. The shells were strung like a garland and wrapped around a flimsy single wire wreath base. I planned on my wreaths being slightly bigger than the ones I bought and with a flat back to limit the damage they might cause to a wall or door.
I had intended to pump this project out quickly. HA! It was a bit more tedious than I had anticipated so my advice to you is to be patient and take your time. If you are doing this as a gift, don’t wait until the weekend before, unless you have a lot of time on your hands. I have no idea how many hours I have in this project (for one wreath), but I would guess around 20 hours? I am happy to report that the second one seems to be moving quicker. I’m hoping to have less than 10 hours in this next one, we’ll see. Your timeframe will obviously depend on your specific project. The trickiest part of this whole process is piecing together the shells, it’s a puzzle. You’ll put a few on only to realize the wire is showing because they don’t lay quite right. Take them off and try again, eventually you’ll get the feel for it. It’s not rocket science, but there is an art to it. You’ll get better at choosing the puzzle pieces.
I’d be remiss if I didn’t mention that after taking on this project I fully appreciate the $1200 and $800 price tag on those boutique pieces. After co-owning a boutique I can gauge the buyer/wholesale cost and retail cost of such items and as a somewhat artistic individual, I absolutely appreciate the time, effort and planning to create such pieces. They were priced relatively well given their size. SO, if you really don’t want to take this project on but love the look, consider finding someone with the artistic know how and pay them fairly for their time! You could cut out the middle man/woman and support a local artist. When all is said and done I’ll have about $150 in these wreaths, $75 each, but that is not including my time. There is unmatched satisfaction in creating something yourself, but no ones knows better than I do that you have to pick your battles. In this case, pick your crafts! In my opinion, should you decide to pay an artist to do this, expect to spend around $250 per piece and don’t be shocked if they say $300 or more. You have to think about what their time and skill are worth.
Alright, get on with it already…..
I’ve tried to be as detailed as possible, but this was me winging it as I saw fit. Trial and error. Change it up and/or add your own techniques. I would love to hear any quick shortcuts or better techniques you come up with!
What do you need?
- Patience
- A large piece of cardboard to protect your work surface, it will get scratched.
- Needle nose pliers
- Wire cutters
- 22 gauge wire. Larger wire will work, but you need to be able to work easily with it. I would recommend stainless steel if you can find and afford it. Especially if you plan to hang these outdoors.
- Heavy duty wreath base. I used (4) 18″ wire bases and doubled them up for use on 2 wreaths.
- Shells of your choice. I was lucky to find oyster shells that already had holes drilled. You can buy oyster shells on eBay or Amazon. Hard to say exactly how many you’ll need, but I’d say several hundred.
- Bin or bucket to place shells in, this keeps your mess somewhat organized.
- Drill and appropriate bits. My oyster shells already had holes and most of what we collected have natural holes. The drill is for those pieces you might struggle with.
- Hot glue gun and plenty of clear glue sticks.
- Gloves if you feel you need them. I didn’t use them because I’m overly tactile and found that they get in the way.
- Felt or something soft to attach to the back of wreath when finished. This helps to protect your hanging surface, door/wall.


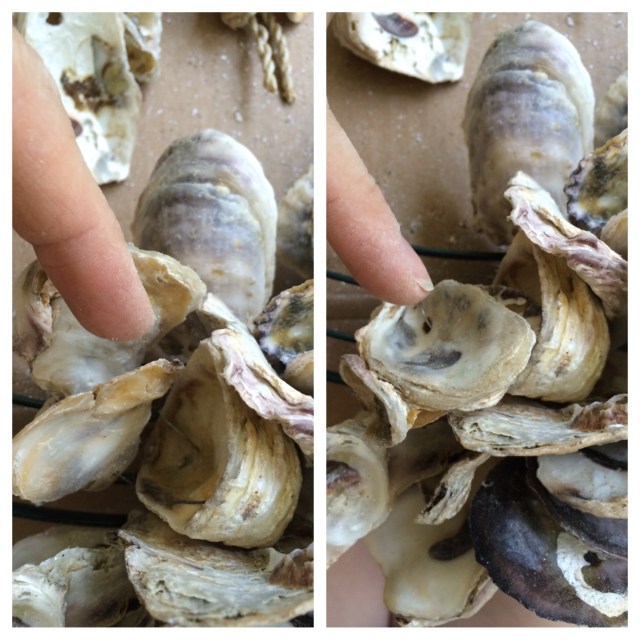
First thing, in my case, was to remove the shells from the smaller wreath; toss the old wire, put the shells in a bin, and say a “Thank You Lawd” I’ve had a tetanus shot. That old wire was rusty and sharp!
You may need to start by drilling holes in your shells. If so, design your layout first so you know where to drill your holes so they will not show. I would advise using a sharpie to mark your drill spot unless you’re good at eyeballing it. You may need to drill more than one hole in the same shell to keep the wire from showing. Keep this in mind when planning a timeframe for your project as it will likely be about 30% of your time. If you are not using oyster shells on your project it could potentially go quicker.
I had already wired the two wreath bases together so no picture of that process, but it’s self explanatory I think (see pic below, upper left). Doubling the base made it easier to secure the wire where I needed it and also provided a heavy duty support to this very heavy wreath! To start I cut a piece of wire about 30″ long (you could cut it longer if you want), folded it in half and attached it to the base. Twist to secure (upper right picture shown below). It seemed natural to work from the outside to the inside, but whatever works for you. I also worked left to right, again this felt natural.


Now starts the puzzle. Once you start adding the shells; use your judgement on which shells to use, how many shells to add before securing the wire, and where to secure the wire. As I said, it will take some trial and error, you’re looking for the shells that fit together best. In my opinion, you want to keep them facing the same direction.
The picture below looks a little nuts, and it is, but as I can best explain it; when you run out of wire, cut another 30″ piece and wrap it around the outside rim and twist it like the first one. Take one side of the new wire and wrap it to remnants of the previous one to keep the new one from sliding. Connecting the wires will keep the shells tightly packed. If you don’t secure the new piece the whole thing gets floppy and unstable. You do not want a lot of movement, more movement means the shells bump each other and chip. They are strong, but delicate. Like me, ha ha! Some shells you’ll attach individually and sometimes you’ll string 2-3 shells to the wire and then attach it. There’s no real method other than following the shape of the shell and the exposure of the wire. You’ll understand that more as you do it.

The shells may shift on you even if you’ve secured and tightened the new wire, that’s ok, once you add more they will settle in. Move them back to the position you want them in before adding more. The picture below shows the exact same shells shifted. On the left they look loose, on the right I put them back in place and proceeded to add more. You could glue them in place if you want, but I save the glue as a last resort.
Now that you have the hang of it, it’s repeat, repeat, repeat. Continue adding shells and wrapping or weaving the wire to secure it.
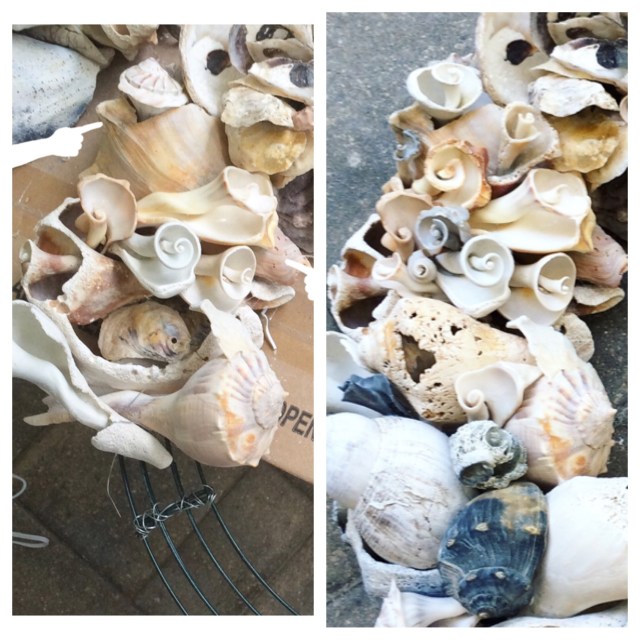
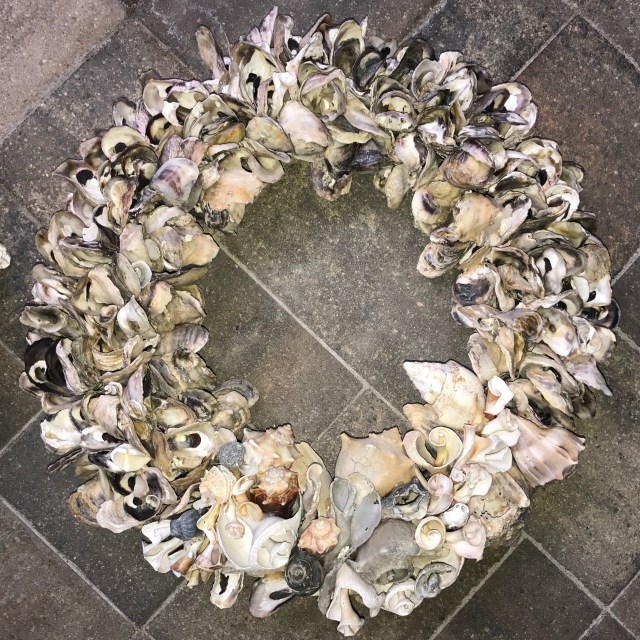
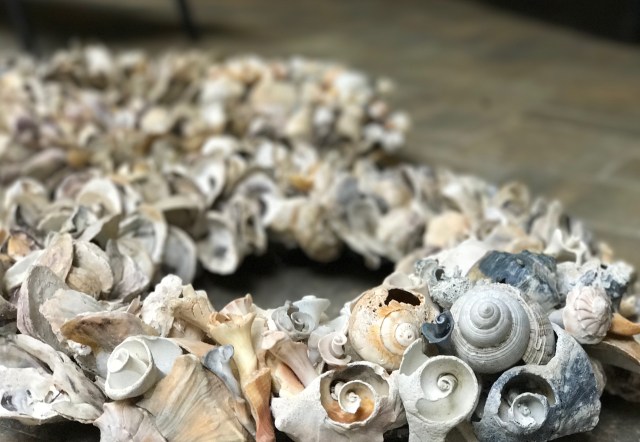
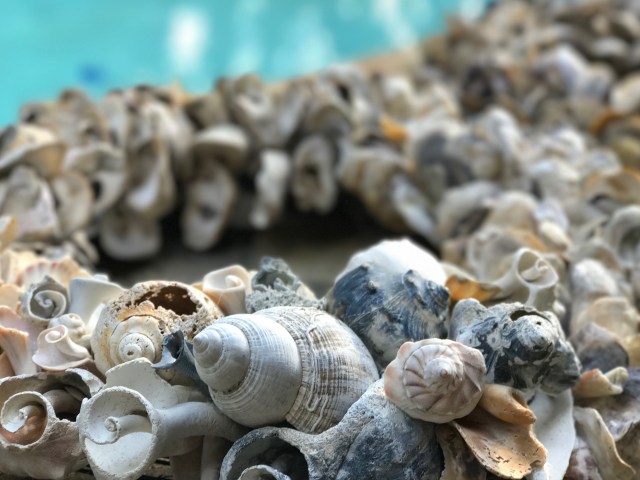
I chose to follow the design rule of thirds. The oyster shells make up 2/3 of the wreath and our collected shells the other 1/3. I did my best to transition them as seamlessly as I could. You’ll have to play with it to see what looks best. I placed our collected shells on top of the wreath and did a “dry fit” if you will. This took a while as it’s an even bigger puzzle. I would advise that you take a photo of the layout you like. Once you move them you’ll forget the placement and want to throw something after spending all that time finding a layout that works and that you like. This picture below was not what I initially wanted, but I could not recreate my initial layout. I was careful when I removed them from the wreath, but I knocked them out of place. Ugh! If there was not a natural hole I arranged them so that the wire would not show under the top layers of shell. I did attach glue on these shells to keep them in place, even if they were wired.
Layers make all the difference…and those shells that are not perfect, they are perfect for this!


Once you get the hang of it it’s easy but tedious. Listen to music or an audiobook, FaceTime a friend or sit in silence if that’s your thing. Now it’s just you and time.

Once I had the majority of the shells where I wanted them and securely attached I went over the wreath and looked for bare spots. I glued smaller swirly shells and smaller oyster shells where needed. The above picture I took prior to adding the extras, my apologies.
My thoughts on finishing; I will attach a heavier wire to the back of the piece for hanging, attach an 18″foam wreath base to the wire base and place felt that is similar in color to the shells over the foam. I’m thinking that this will keep the shells sitting about 1/2″, give or take, off of the door and provide a soft back to avoid scratching the surface. I will position the wreath to hang as it is situated in the photo, with the larger shells to the bottom left.
The second wreath is coming along, although I’m having a little trouble getting it the way I want it. Since my plan is to put them on our front doors I would like the shells on the second wreath to mirror the first one. The shells are not laying as smoothly clockwise as they do counter clockwise. In my attempt to avoid cussing and throwing the shells, I’m keeping in mind that these are made from natural material. These may be two wreaths made out of the same material, but just like humans they are all unique;).
Good Luck on your projects! I’d love to see what you create and ideas you have so please share! Feel free to ask me any questions as I am sure some of the above directions may not be clear. I learn from others learning if that makes any crazy sense!
~Holly
8/12/17
Sigh….well, here it is more than a year after I started this project and began this post. A few years ago I would’ve beat myself up a bit for not finishing in a timely manner; however, in my quest for personal growth (LOL) I no longer allow myself to engage in garbage mental behavior. Instead, I give my past self kudos for getting as much done as she did! All I had to do this morning was load a few pictures of the completed project, write a few finish notes and this little afterthought.
I completely own the procrastination portion of my personality. I have grown to consider that it is not a bad thing. Possibly a tad warped in my view, but I now see it as a great strength. HA HA! I prioritize well and my brain seems to work better under pressure. Life may start to get crazy in the next few months (that’s a good thing), so I am motivated to complete all of the little projects hanging in the background. It provides me with a nice sense of accomplishment even though I know that sentiment is laced with a tiny bit of BS, te he he.
If your goal is to hang these outside I would highly recommend spending a little extra money and investing in rust proof wire. Heavy floral wire is fine if you are planning indoor use, but IT WILL RUST AND BREAK with exposure to humidity and the elements. These were going on our front doors, not anymore. I left them outside on the lanai, it was nicer to work out there, but I had to rewire quite a few of the oyster shells and the hot glue would wear down. I have no idea as of now where these two beauties will find their final resting spot. Possibilities include the guest room, entryway or maybe even my office. Who knows. It’s not like I’m in any hurry right? Giggle.
You will most likely find a better way to execute your project, I hope you do! The imperfect shells are truly wonderful for this project. As I read my year old thoughts, I realized “the perfection of imperfection” lends itself well to a cheesy little metaphor for life and the way we are as individuals.
The perfect shells are beautiful, but not always useful and you can’t see the inside. You find yourself asking what, if anything, is living in there? HA!
Even those of us with the most wear and tear are good for something, for someone. Once you see the inside you realize there may be a little rough sand or dirt, but it’s also multicolored and textured or possibly dull and smooth. I suppose I simply prefer knowing the character of all nature at a deeper level.
Who knew a craft project would provide such insights? 😉

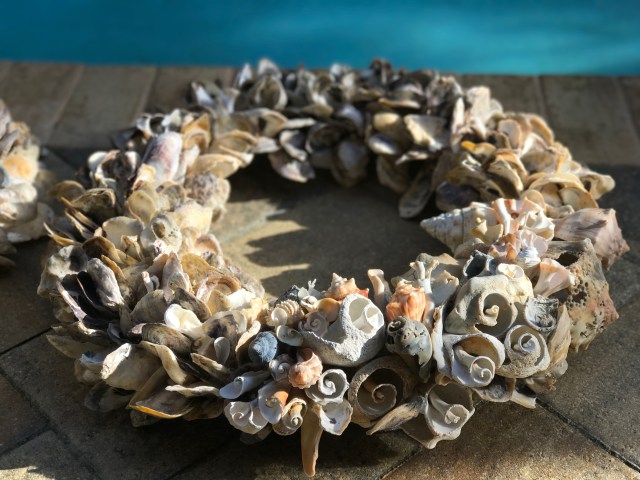

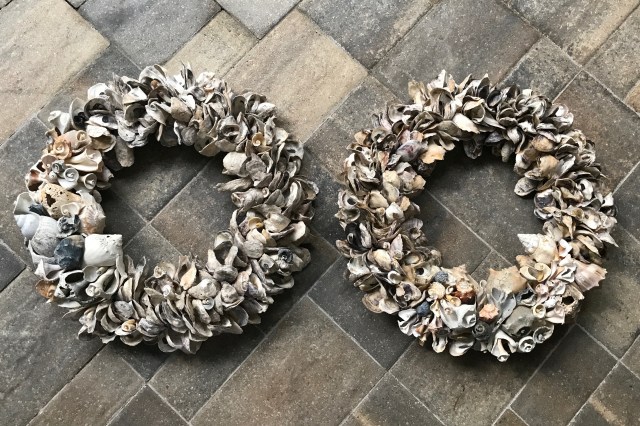
As you can see they are not the exact same size. I was aiming for one to flow one direction and the other, well…the other direction. The one on the right is the second one, I think it went against the natural curves of the shells. As always, it’s in our best interest to work with nature;). Good luck with your project!